
How To Make A Flying Halloween Bat
This page shows you how to make a flying Halloween bat toy with your child. It's a great toddler craft activity.
I made one with my 3 -year-old, but my older son aged 6 also got involved and really enjoyed making one too.
Basically it's such a good idea, that kids (and adults!) of all ages will get something out of making this.
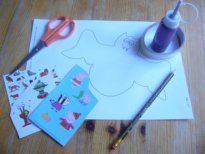
What You Will Need To Make A Flying Halloween Bat With Your Toddler
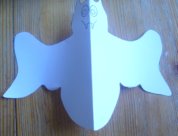
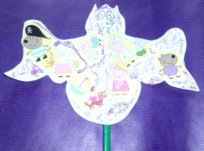
- First of all, cut the bat out and fold it down the middle as shown.
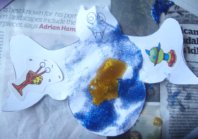
Now comes the fun bit! Help your child decorate their bat. You can see that someone got a bit over enthusiastic with the glitter glue here - but when it dried out it was not so heavy (you can see how aeronautical I'm thinking here LOL :).
If you have used paint or glue, leave it to dry before continuing.
I have found that with toddlers, waiting for paint to dry, is a real no no. Unless they have something else to continue with, the apron will be off in a flash and the toy box opened.
Never to return.
So I have taken a leaf out of Frank Clarkes daytime painting show, and I use a hair dryer on the paint to speed the drying process up.
Now obviously, if it is glitter on glue on your flying Halloween Bat, you can still use the hair dryer, but on a very gentle blow. But it seems to work well on painted items, and really speeds the process up.
Your toddler will stay interested, especially if other items start to fly away.
To Help Busy Mums and Dads Here Are Some Related Shopping Items
When you purchase from this link, you are actually purchasing from Amazon.com, and you can have peace of mind that your order will be processed by Amazon’s secure order server.
Other Bible Crafts Just For You
Free Bible Crafts l Home l A light unto my feet l Seed Sower Parable Craft l Isaac Crafts l Joseph Crafts l Toddler Christmas Idea l Toddler Christmas Activities l Toddler Christmas Crafts Widows Mite Crafts l Abraham and Sarah Crafts l Prodigal Son Craft l God is watching craft l Samuel Bible activities l Jesus as a boy Bible activities l Lords Prayer Crafts l Daniel Bible Crafts l Noah's Ark Crafts l Fruit of the Spirit Craft l Church As A Body Craft l Fisher of Men Bible Crafts l Moses Bible Crafts l Fruit of the Spirit Craft l Toddler Creation Craft l Toddler Easter Activities l Celebrate Passover l Bible Friendship Activities l Jonah Whale Activity l Jesus Miracle Activities l Toddler Prayer Craft l Water into wine l

More To Explore
Amazon Prime Day - $40 Off Fire Kids Edition

Most Popular


Many Hints and Tips, To Deal With Your Toddler and Beyond.
Recent Articles
-
Toddler Tiger Toy, FurReal Roarin' Tyler The Playful Tiger
Aug 23, 17 03:56 PM
Toddler Tiger Toy, FurReal Roarin' Tyler The Playful Tiger, One Of The Hottest Toys This Year From The New York Toy Fair -
LEGO Creative Boost Toolbox, A Major Player At The Toy Fair NY Read Our Review
Aug 23, 17 03:41 PM
LEGO Creative Boost Toolbox. Always A Major Player At The Toy Fair NY Read Our Review On This Must Have For This Year, Before They Are Gone -
The Pie Face Sky High Game, From The Toy Fair, Check Out Our Review
Aug 23, 17 03:33 PM
The Pie Face Sky High Game, From The Toy Fair Held In New York, Check Out Our Review From One Of This Years Must Have Game


New! Comments
Have your say about what you just read! Leave me a comment in the box below.