
Kids Hand Prints Calendar To Create With Your Toddler
This guide shows you step-by-step how to make a kids hand prints calendar, just like I did with my toddler.
Scroll down for instructions on creating a foot prints calendar.
These calendars make thoughtful and attractive Christmas - or birthday presents, if someone has a birthday towards the end of the year.
I have found they are a real hit with the older generation, who always seem to treasure children's art more than most.
So What Do I Need To Create Footprints And The Kids Hand Prints Art Work
The best thing is they cost less than the price of going out for a cup of coffee!
You don't need any special decorations. You can buy them in individual packs, or usually find what you need in a basic children's craft kit. Neither are very expensive.
You Will Need
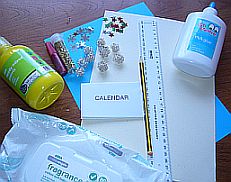
- A4 piece of thick card
- A4 piece thin card (coloured is best)
- Mini calendar
- Children's craft paint
- PVA glue
- Decorations (stars, glitter etc)
- Pencil
- Ruler
- Baby wipes
- Scissors and newspaper (not pictured)
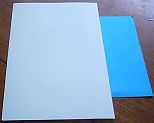
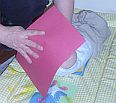
First, you need to prepare the paper before doing the hand print.
Lay out the paper under the card as shown, and using the edge of the card, draw a line down the paper.
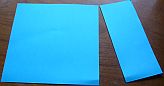
Now cut along this line.
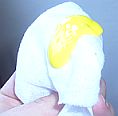
Next, apply the paint on your toddler's hands. A baby wipe will do fine for this job, but make sure it completely covers the whole hand and all the fingers and thumb.
Encourage your toddler to press their hands down as flat as possible.
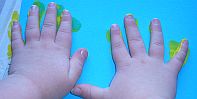
When I did this, I got mine to practice before I put the paint on his hand - I almost forgot that he would not automatically know to press down flat on the paper.
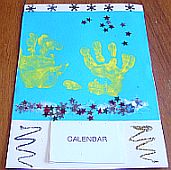
In the photo, notice that his left hand is not completely on the card. It's not a problem - art does not have to be 'correct'.
Leave the prints to dry.
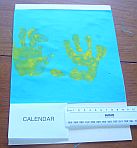
Come back later and position the coloured card onto the backing card.
To centre the mini calendar, position it as shown here and measure the remaining width of card. Here that width is 11cm.

Divide that number by 2 - here 5.5cm.
I measured 5.5cm in from the left and made a small mark. Then I did the same on the right side.
Stick the calendar down, laying it in the center as guided by the 2 markings.
It's finally time to let your toddler decorate the kids hand prints calendar!
Given the choice, many kids will stick anything and everything to the calendar. Too much freedom to glue usually results in the hands being obscured.
Be in control of the glue, and only choose decorations that match and are not too heavy for PVA glue, or the card itself.
Don't be afraid to put alot of glue on the picture. It helps all the decorations stick, and PVA glue is virtually invisible when it dries.
Variations on this design - you could make a kids hand prints calendar by printing multiple hand prints all over the card, or just let them grasp the edges, to make a finger prints design.
Now Try Footprints Calendar
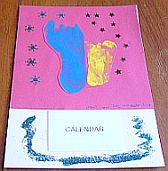
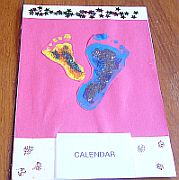
Foot prints calendars are a good idea if you have a baby, and want to give a present that has prints from both children.
Taking a baby's hand print is not an option, and 2 foot prints look better than a toddler hand print next to a baby foot print.
The only practical difference between kids hand prints and foot prints pictures is that with a foot print, the child's foot may well slide around. It's nowhere near as easy as getting a good hand impression.
So what you need is 2 or 3 extra sheets of the thin coloured card. Use one sheet in case you need to have a few attempts before getting a decent toddler print.
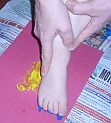
Hold your child's leg securely while they stand on the card to print their foot.
The baby foot print will be an easier job - hold the card against the foot as shown.
The 2nd extra sheet is necessary in case you don't manage to get the two prints side by side.
I succeeded here in these photos, but wasn't so lucky another time I tried! What I did was cut each print out and stick them together on the extra sheet. With all the extra decorations, it wasn't really noticeable.
And that's how you make kids hand prints and foot prints. A bit messy, but good fun!
Because leaving the prints to dry was not an option for me. I use to give the artwork a little blast with the hairdryer. That way everything is started and finished, no hanging around waiting.
To Help Busy Mums and Dads Here Are Some Related Shopping Items
When you purchase from this link, you are actually purchasing from Amazon.com, and you can have peace of mind that your order will be processed by Amazon’s secure order server.

More To Explore
Amazon Prime Day - $40 Off Fire Kids Edition

Most Popular

Many Hints and Tips, To Deal With Your Toddler and Beyond.
Recent Articles
-
Toddler Tiger Toy, FurReal Roarin' Tyler The Playful Tiger
Aug 23, 17 03:56 PM
Toddler Tiger Toy, FurReal Roarin' Tyler The Playful Tiger, One Of The Hottest Toys This Year From The New York Toy Fair -
LEGO Creative Boost Toolbox, A Major Player At The Toy Fair NY Read Our Review
Aug 23, 17 03:41 PM
LEGO Creative Boost Toolbox. Always A Major Player At The Toy Fair NY Read Our Review On This Must Have For This Year, Before They Are Gone -
The Pie Face Sky High Game, From The Toy Fair, Check Out Our Review
Aug 23, 17 03:33 PM
The Pie Face Sky High Game, From The Toy Fair Held In New York, Check Out Our Review From One Of This Years Must Have Game


New! Comments
Have your say about what you just read! Leave me a comment in the box below.